Showing posts with label lawn fawn. Show all posts

Tuesday, December 18, 2012

Lawn Fawn & May Arts

Last week, Lawn Fawn and May Arts teamed up and shared projects between the blogs. This was my layout done for the Lawn Fawn blog using May Arts ribbon.


It's kind of hard to tell, but I layered two ribbons around the outside of the card stock and stitched them down. I loved the texture and dimension it gave to the layout!

Thanks for stopping by!

Thursday, December 6, 2012

Lawn Fawn Inspiration Week December 2012 | Part Two

And hello again! Lawn Fawn is continuing its Inspiration Week with another new stamp set called "Bee Mine". 


I created this card by cutting down a block of pink card stock and folding it in half. I cut a block of paper from two different papers from the Dewey Decimal collection and adhered them down with my sewing machine. I took a piece of white card stock and stamped the sentiment "Bee Mine" in two different color inks. I stamped out the little bees and colored them in and cut them out and used foam tabs to adhere them down. Lastly, I put a small rhinestone in each corner.

Thanks for stopping by!

Wednesday, December 5, 2012

Lawn Fawn Inspiration Week - December 2012 | Part One

Hello! Here is the card that I made using the new Lawn Fawn stamp set "Here's the Scoop"! Such a cute set that can be used in a multitude of ways!


I created this card by cutting a block of Kraft card stock and folding in half. I used Versamark ink and gold Zing and one of the hearts from the Lawn Fawn stamp set and embossed the hearts on the upper portion of the card. I layered some papers from the "Dewey Decimal" collection and then stamped the sundae bowls on to the white card stock. I colored in some of the elements on the stamps and added little rhinestones in place of the cherries. I adhered this down with my sewing machine. I wrapped some red and white Lawn Trimmings twine around it and then lastly stamped my sentiment on white card stock and used foam tabs to adhere to the upper portion of my card.

Thanks for stopping by!!

Friday, November 16, 2012

Lawn Fawn *Fa-la-la*

Happy Friday to you all! Lawn Fawn has been packing the blog with lots of holiday goodness the past few days! My layout was up on the blog today and I'm sharing here as well.


I picked a few pictures from the last holiday season that were scenes from around the house and used them for my layout. I used a bunch of the super cute "Fa-la-la" element stickers on the layout; they are the perfect finishing touch!

SUPPLIES: Lawn Fawn "Fa-la-la" Pattern Paper, Lawn Fawn Lawn Trimmings, Lawn Fawn "Fa-la-la" Element Stickers, Lawn Fawn "Fa-la-la" Narratives. 

Thanks for taking a peek!

Monday, October 29, 2012

Lawn Fawn & Scrapbook Adhesives

Lawn Fawn and Scrapbook Adhesives have joined forces this week and both are bringing lots of projects and layouts over the next few days on their blogs! My layout was up today on the Lawn fawn blog


I used the Dewey Decimal pattern papers and used the EZ Runner, Thin Foam Dots, and Thick Foam Dots by Scrapbook Adhesives for the project! Make sure to check out the blogs this week!!

Happy Monday!

Friday, October 19, 2012

Lawn Fawn Inspiration Week | 2


Good Morning! I'm back again with another project for this month's Lawn Fawn Inspiration Week! This layout was made with the new Christmas collection called "Fa-la-la". I truly love the color scheme - the pops of blue are a fun twist to the traditional Christmas colors!


Lawn Fawn Supplies: "And a Partridge", Fa-la-la Papers, Fa-la-la Card Stock Stickers, Fa-la-la Alphabet Stickers, Red Twine.
For this layout, I stacked strips of pattern paper from the Fa-la-la collection and stitched them down on the bottom 3/4 of the layout. I then stitched strips of vellum over top of that. I placed my picture in the upper part of the layout. I then stamped in a light gray ink on the strips of vellum the sentiment included in the stamp set "and a Partridge". I stuck some of the label stickers underneath the strips of paper, including a journaling block. I stapled down the length of red twine, stamped the little hearts, and adhered the veneer asterisks. Lastly, I matted the card stock sticker with Kraft paper and used foam dots to adhere it down; I put the initials of my sister and her husband on the front of the circle sticker.

Thanks for stopping by!

Wednesday, October 17, 2012

Lawn Fawn Inspiration Week

Welcome! Lawn Fawn's Inspiration week has started and I have a sweet little card up on the blog using the "Owl I Want for Christmas" stamp set! That little owl is super cute :-)


To create this card, I cut a block of green card stock and folded it in half. I cut a block of the pattern paper and adhered it down. I took a piece of Kraft card stock and cut it slightly smaller than the pattern paper; I rounded the edges and then stamped the owl all over the card in brown ink. I stamped a few of the cutesy little hearts in red and then stitched that down with my sewing machine. Lastly, I stamped out the speech bubble in green and stamped my sentiment in the middle in red ink. I used foam dots to adhere this to the Kraft card stock.

Supplies: Lawn Fawn (Fa-la-la 6x6 Paper Pad, Speech Bubble Stamp, Owl I want for Christmas Stamp set). 


Thanks for taking a peek!  Make sure to check out the Lawn Fawn blog for projects from the rest of the design team and make sure to take part in the big giveaway!

Wednesday, September 26, 2012

Lawn Fawn

Hello again! Here's a greeting card that I made with the new "Dewey Decimal" paper collection and the "So Thankful" mini stamp set by Lawn Fawn!


To create this card, I cut a block of blue card stock to 8.5 x 5.5 and folded in half. I stamped in a tone-on-tone technique on the upper part of the card and used the cute little pumpkin stamps. Then, I cut a block of blue pattern paper from the 6x6 Paper Pad and adhered it down on the lower part of the card; I layered a block of brown dotted paper on top of that. Then I took a piece of white card stock and used a light gray ink to stamp the phrase repeatedly "so thankful for you" across it. This was then adhered on top of the other pattern papers. I punched some circles out and used foam dots to adhere them. I took a card stock sticker and stamped the sentiment again on that in brown ink. This was layered on top of the other circles. Lastly, I punched out a few leaves with a Martha Stewart punch and layered them underneath the sticker.

Lawn Fawn Supplies:
1.  Dewey Decimal 6x6 Paper Pad
2.  Dewey Decimal Card Stock Stickers
3.  "So Thankful" stamp set

Thanks for taking a look!

Monday, September 24, 2012

Fa-la-la! *Lawn Fawn*

Christmas is my favorite holiday of the year!! I love everything about it: the sights, sounds, smells..everything! When Lawn Fawn announced they were putting a Christmas collection together this year, I was super excited!  This is my first project done with this collection, but will certainly not be my last! I love the designs and colors throughout the entire collection. 


I changed up my normal mode of scrapbooking when I put this layout together. I started with a Kraft base and painted it with a layer of gesso. While the gesso was still wet, I layered six different sheets of pattern paper from the 6x6 pad. I then painted a thin layer of gesso over the tops of the pattern paper - this gave it a more muted, frosty look. I layered some pattern paper and vellum in the middle of the layout and adhered my photo on top. I created three tags from the pattern paper and used the new red and white twine on them. I layered two of the tags upside down in the upper right hand corner and layered a card stock sticker on top. I tucked the other tag up underneath some of the layers behind the photo. I punched a punch of snowflakes out with Kraft paper and then punched another layer from vellum. I layered them together and stapled them. I sprinkled these across the layout. Lastly, I placed my title down - I started on the picture and also placed two words below the picture. The green alphabet letters are the new alphas in this collection!

SUPPLIES:
1.  Fa-la-la 6x6 Paper Pad
2.  Fa-la-la Green Alphabet Stickers
3.  Fa-la-la Card Stock Stickers
4.  Fa-la-la Red Twine

Thanks for taking a peek and stopping by!

Wednesday, August 22, 2012

Lawn Fawn Part 2 (Inspiration Week)

Lawn Fawn inspiration week continues! This layout highlights the "Check this Out" stamp set and the "Dewey Decimal" collection. They go hand in hand just perfectly!


To create this layout, I used one of the "Dewey Decimal" pattern papers as by background paper. I misted some Studio Calico Mr. Huey in opposite corners and then placed strips of pattern paper around the outside edges. I used the library card stamp in the "Check this Out" collection on Kraft card stock and used that as a  "mat" for my photo. My photo was then layered on top. I placed some punched paper circles around the layout and used foam tabs to adhere some of them down. I cut out one of the banners from a piece of pattern paper and placed one strip under the photo and one in the top right hand corner. I used one of the stickers from the sticker sheet for my journaling and placed the "Happy Day" sticker on top of the banner in the right hand corner. Lastly, my title was placed on top of my photo and I stamped a sentiment directly on my photo using Staz On ink.

SUPPLIES:
Lawn Fawn "Dewey Decimal" Pattern Papers
Lawn Fawn "Dewey Decimal" Cardstock Stickers
Lawn Fawn "Dewey Decimal" Alphabet Stickers
Lawn Fawn "Check this Out" Stamp Set
Typewriter
Sewing Machine
White Thread
Staz On Ink

Thanks for taking a peek at my project!

Monday, August 20, 2012

Lawn Fawn (August Inspiration Week)

Lawn Fawn debuted two new paper collections at the Summer CHA show in July! This collection, "Dewey Decimal", is a huge hit with me! I love books and libraries! Plus, the B sides of these papers make this collection something that can be used without a school/book/library theme :-)


I created this layout by taking a block of the ledger paper and adhering to the Kraft card stock. I then placed strips of the Lawn Fawn pattern paper at a diagonal on the ledger paper. I sewed down each of the strips and stapled some little tabs using my Fiskars tab punch on them. Above the strips, I layered some punched circles, Instax photos, and stickers. My journaling went to the right side of the photos. I placed a few little banner strips in the upper right hand corner and stitched them down. I sprinkled some brads on and placed my title and small banner sticker on the strips of paper.

SUPPLIES:
Lawn Fawn Dewey Decimal Pattern Papers
Lawn Fawn Dewey Decimal Sticker Sheet
Lawn Fawn Dewey Decimal Alphabet Sticker Sheet
Lawn Fawn Twine
Basic Grey Brads
Typewriter
Sewing Machine

I LOVE the color scheme in this collection. They are such warm, homey tones! I created this layout from a sketch by Kinsey Wilson.

Thanks for taking a peek!

Thursday, July 12, 2012

Lawn Fawn *CHA Summer 2012*

Make sure you check out the Lawn Fawn Blog today and in the coming days!! They are starting to share the new releases for CHA Summer!! The stamp sets below were debuted on the blog today and they are all way too cute!  Also, make sure you leave a comment on the post - I heard there was a giveaway!


Monday, June 18, 2012

Lawn Fawn *June Inspiration Week*


This week is inspiration week on the Lawn Fawn blog! Make sure to check each day for more projects from the Design Team and enter into the giveaway!

I created this little card above by stamping the pink card stock base with one of the border stamps from "Belinda's Borders". I cut a block of pattern paper from the Bright Side collection and used it as a mat for the yellow card stock that I also stamped with "Belinda's Borders". I stamped my sentiment on white card stock and matted that with Kraft card stock. I punched out three flowers using pattern paper from the Bright Side and placed a brad as the flower center in each one.

SUPPLIES: Bazzill Cardstock, Lawn Fawn Pattern Paper, Lawn Fawn Stamps, Staz On Ink, Jenni Bowlin Ink, Martha Stewart flower punch, Basic Grey brads, American Crafts adhesive.


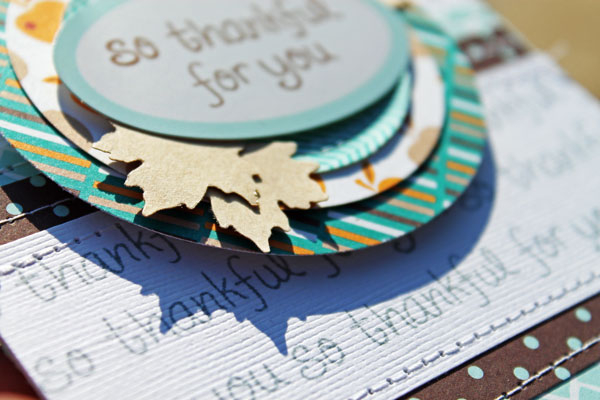
To create this layout, I cut a yellow piece of card stock down slightly smaller than 12x12 and adhered it down to the blue card stock. I took a piece of white card stock and cut it down to fit on top of the yellow card stock and placed punched circles from various pieces of pattern paper from the "Bright Side" collection. I used my sewing machine to stitch down all of the circles. I placed my two 4x6 photos at the bottom. I had a small space between the circles and my photos, so I took a strip of the Kraft chevron paper and stamped one of the borders from "Belinda's Borders" on the top and bottom of it. My title and journaling block were then placed on top of that. To finish my layout off, I placed some brads and wood veneer embellishments on some of the circles. I also stamped some sentiments from one of the Lawn Fawn sets and tucked them under some of the embellishments.

SUPPLIES: Bazzill Card Stock, Lawn Fawn "Bright Side" Collection Papers, Lawn Fawn Stamps, Jenni Bowlin Ink, Studio Calico Wood Veneer Shapes, American Crafts Thickers, Basic Grey Brads, Sewing Machine, Typewriter.

Thanks for stopping by!

Friday, June 8, 2012

Lawn Fawn & May Arts


Lawn Fawn and May Arts teamed up this week to bring some projects to the blogs using both products together! I was lucky enough to get a big bag of various ribbons/twine to use on a layout and here it is!

I adored the blue and orange chevron striped ribbons and decided to use them to make my own custom embellishments. I have a hard time using ribbon on layouts and tried to find a different want to use it. 


 I took a piece of scrap card stock and glued down a piece of orange ribbon and then a piece of blue ribbon on top of each other until I had four rows of ribbon. Then, I flipped over the piece of card stock and traced out a circle on the back side of the paper. I carefully cut the circle out using a very sharp pair of scissors and I then had a ribbon covered circle! Lastly, I ran the circle through my sewing machine and stitched out a large "X" across the ribbon - one to give it a fun touch and two to adhere it down more securely.


I then placed my pattern papers from the 6 x 6 pad and placed my picture on top of that. After I had everything placed where I wanted it (including my title), I glued down my circles - I used foam tabs on a couple of them for some depth/dimension.


Thanks for taking a look at the process! Make sure to check out both the Lawn Fawn Blog and the May Arts blog for some more projects made by the design teams!

xo,
Melissa

Tuesday, May 29, 2012

Lawn Fawn - May Project #2

Hello again! I'm back sharing another layout made for the Lawn Fawn blog! I used the "Bright Side" Collection and two stamps from new collections coming out!


To create this layout, I placed a block of the Kraft Chevron Lawn Fawn paper in the upper part of my layout. I stitched it down using a repeated square pattern. I placed my photos at the very bottom of this block and then placed a strip of white card stock that I stamped one of the new borders on in orange ink. I punched out a strip of the purple flowery paper with a border punch and placed it on top of the stamped border; then, I stapled down some lengths of Lawn Fawn twine between the two strips. I punched out the postage stamp looking pieces of paper from various Lawn Fawn papers and adhered them down in each of the squares at the top. I placed brads on a few of those punched squares. I punched out a tab in white card stock and stamped my date on it and placed it at the top; my title was placed above my pictures and border strips and my journaling strip was placed beneath my photos. Lastly, I stamped each photo with a 1, 2, 3, & 4 using the new Quinn's numbers stamps!

SUPPLIES: Blue and White Card Stock by Bazzill; Pattern Papers all by Lawn Fawn; Twine by Lawn Fawn; Heart Border Stamp and Number Stamps by Lawn Fawn; Ink by Jenni Bowlin and Staz-on Ink; Tab  and Postage Stamp Punches by Fiskars; Alphabet Thickers by American Crafts; Date Stamp from Office Supply Store; Tiny Attacher by Tim Holtz; Brads by Basic Grey and American Crafts.

Sunday, May 27, 2012

Lawn Fawn - May Project

Hello everyone! This is one my layouts for the inspiration week for Lawn Fawn! You can see the original post on the LF blog and see all of the other fantastic work by the design team!

I created this layout using the "Bright Side" collection and two stamps from two of the new collections!


To create this layout, I stamped the edges of the gray Bazzill cardstock with the new borders by Lawn Fawn. I used Versamark to stamp them and used white Zing on them and used my heat gun to set it. I then cut strips of paper from two different pattern papers and wove them together and then stitched them down with my sewing machine. I matted my picture with a lighter piece of gray Bazzill card stock and used pop dots to adhere it down. I stamped my sentiment on one of the journaling tags from the "Bright Side" collection and used the alphas from the collection for my title. I then punched out two different sized hearts from yellow and Kraft colored Bazzill card stock and sprinkled them down the length of my layout.

SUPPLIES: Gray, Yellow, Kraft Card Stock by Bazzill; White Zing by American Crafts; Versamark Ink; Smell the Roses, Jump for Joy, Happy Thoughts pattern paper by Lawn Fawn; Jenni Bowlin Brown ink; Happy Day Stamps and Border Stamps by Lawn Fawn; Gel Pen; Heart Punches by Fiskars.

Tuesday, April 24, 2012

Lawn Fawn - April Projects

Hey everyone! Here are my projects for Lawn Fawn for this month!  We were to use the "Handmade with Love" sentiment stamp and create a layout using the "Bright Side" collection


SUPPLIES: White Card Stock & Kraft Card Stock by Bazzill, Handmade with Love stamp by Lawn Fawn, Black ink by Staz-on, and Alcohol inks by Ranger.

For this card, I took a block of white cardstock sized to 8" x 6" and folded it in half. I then took 7 different alcohol inks and dripped them down the front of the card. These dry fairly quick and while they were drying I stamped out the "Handmade with Love" sentiment on Kraft card stock using black Staz-on ink and cut the sentiment out. I punched out a circle from white card stock and adhered the sentiment to it. I then used foam tabs to pop up the circle and adhered it to the front of the card! This would be a great card to make multiples of since minimal ink was used and you can create as many of the stamped sentiments as needed!


For this layout, I cut out strips of paper of different widths from the Bright Side collection. I pulled out the browns, grays, & oranges from the collection. On each of the Kraft colored strips, I stamped the word "Love" from the "Handmade with Love" stamp using brown and red ink.  I actually cut my stamp apart so that I had the word "love" apart from the rest of the phrase!  I stitched down each strip of paper using two different kind of stitches. Then, I placed my photos in a staggered row towards the bottom part of the layout. I used foam tabs for dimension to adhere them down. I placed my title in a vertical row on one of the orange strips of paper. Lastly, I punched the hearts from the corresponding paper and placed those on top of the strips and used foam tabs on some of them. I layered some of the hearts and placed a wood veneer embellishment on top.


SUPPLIES: The Bright Side Collection by Lawn Fawn, Cream Card Stock and Gray Card Stock by Bazzill, Alphabet letter stickers by Lawn Fawn, Brown and Red ink by Jenni Bowlin, "Handmade with Love" stamp by Lawn Fawn, Wood Veneer Asterisks by Studio Calico, White Thread by Coats & Clark.